Showing posts with label Crafts. Show all posts

Monday, December 12, 2011

JOY Ornament

This has seriously been the most relaxed, stress-free Christmas season that I can remember.  In fact, Saturday I was able to enjoy the day with friends, even though Christmas is only two weeks away!

We had lunch at a place that reminded me of a tea room, though it really isn’t.  We had paninis, chicken salad sandwiches and I had a sweet potato cupcake for dessert.  Good food and good friends!

The front part of the place is a gift shop, so naturally there was some shopping afterwards.  I needed to find an ornament to give to a friend at Sunday School the next day and was delighted to find one I thought she would like.


SONY DSC

Now one of the reasons I wanted to share this isn’t so much for the story of my fabulous Saturday, but to point out how easy it would be to make this ornament since we are all about the crafting.  The red ribbon was velvet, little rhinestones all around and I’ve seen the blingy letters at the craft stores.

So cute…. and she LOVED it!

Tuesday, December 06, 2011

Christmas Sticker Soap Pump

I’ve said before and I’ll repeat it often – I *love* Pinterest and blogs for inspiration!  So much creativity that everybody  shares and then the not as creative types like me can recreate and enjoy with our families.

This particular item I’ve seen time and again and I finally took the 10 minutes – I kid you not – to sit down and make one.  I like it enough that I’ll likely do one for every season.


SONY DSC

A Christmas soap pump!  So easy peasy and FAST to make.  I used the big box store brand of hand soap and peeled off the front and back label.  Next a bit of Goo Gone took off the remaining bits of glue so that there was a clean bottle to work with.

I used stickers with a clear background, but I don’t know that it’s any kind of requirement.  And last a jaunty bow around the neck.  I think I would prefer ribbon a bit less wide, but this is what I had in Christmas colors and didn’t want to buy any more.  You can barely tell in the photo above, but I also put a star sticker on the top of the pump.


SONY DSC

Ta da!  Super fast and it makes me smile every time I go to wash my hands.

Now to watch for more 50% off sticker sales and get ready for the next season!


** Linking to Get Your Craft On, Take-A-Look Tuesday, Nifty Thrifty Tuesday, Topsy Turvy Tuesdays, Whatever Goes Wednesday, Inspired By You Wednesdays

Wednesday, November 30, 2011

Thanksgiving Turkey Craft

Early morning on Black Friday some of the girls wanted to brave the crowds at the Big Box Stores.  I stayed home with the 2 Littles, Brooklyn and her cousin Kaitlynn so that we could do a craft.

I’ve looked all over my bookmarks and can’t find the original site to credit – and really I’m shocked that I must not have pinned it.  I’ll keep looking though.

What we made were Stuffed Turkeys!

OLYMPUS DIGITAL CAMERA

The instructions were to take a small plastic container (I found mine at Hobby Lobby and used a 40% off coupon) and use brown fun foam in the shape of a peanut for the turkey head.  I let the girls cut their own and since they are 4 they wanted to do it their way – and I wouldn’t trade that for the world.  They had quite a bit of fun doing the cutting.

We glued on googly eyes and they cut orange noses from fun foam.  The tail feathers are pipe cleaners folded over and twisted together, then taped to the back. 

Our turkeys were ‘stuffed’ with m&m’s.  And of course, as grandmas sometimes do, I said something that became one of those family sayings.  The girls were VERY interested in eating the m&m’s and I told them they couldn’t eat them all because they would go crazy with all that sugar.  Later I heard Brooklyn telling her mom that m&m’s make you crazy.  sigh….   4 year olds can be quite literal!

I really think this concept could be used for other holidays and animals.  Perhaps a Rudolph for Christmas with his red nose, antlers and cute felt tail!

OLYMPUS DIGITAL CAMERA

Sunday, October 23, 2011

Burp Cloths using the Embroidery Machine

My sister-in-law is down this weekend because we have a baby shower to attend!  My cousin’s son is expecting their first (a boy!) so there will be much rejoicing.

I wanted to share the burp cloths that my mom made because I think they are so cute. 


SONY DSC

Mom uses her embroidery machine and finds the most darling little patterns.  I love that these are so unique and the dragon is just too cute for words.  For those of us without an embroidery machine (insert sad face here) I’m sure we could come up with something cute to applique in place of the embroidery.


SONY DSC

Mom sews on a strip of ribbon and then does a satin stitch at the burp cloth edge.  Simple and it really makes it so special.


Close up photos of the embroidery:

SONY DSC                     SONY DSC

Tuesday, October 04, 2011

Minky Monkey Pillowcase

SONY DSC

Isn’t this CUTE???  While looking through Pinterest I found a tutorial for a Minky Pillowcase and just knew I needed to make one for Brooklyn.  The tutorial is so well written and easy to follow.

I found the fabric at a local quilt shop and it was kind of funny because when the gal cut the fabric and then looked on the bolt to get the price she said “WOW!”  I felt the need to explain that I was making a pillowcase for my granddaughter and knew that in addition to having the fun of making it I would also have the fun of giving it to her. 


SONY DSC

This was some seriously cute fabric!  And there is nothing in the world as soft as minky.  I decided to make this pillowcase travel pillow size because that just seemed like the right size for a four year old.


SONY DSC

It took no time at all to sew this and I used the serger since I didn’t want all those little minky snippets to get all over the place when Brooklyn took it home.  Really I think the only reason it took as long as it did to sew it was that I kept stopping to stroke the soft fabric.  :)


OLYMPUS DIGITAL CAMERA

I gave it to her this weekend and she loved laying on the floor and playing with the toys.  She kept telling me how soft it was!

Since she likes this I might even see what other minky fabrics they have and make a second one for her.  Grandmas get to do stuff like that you know.  Smile


Linking to – Get Your Craft On, Take a Look Tuesday, Topsy Turvy Tuesday

Thursday, September 15, 2011

Angelic Floral Arrangement

It strikes me as rather funny that I love to do so many crafts, and even consider myself pretty good at them, and for the life of me cannot arrange flowers!

Fortunately my daughter can! So when she showed up at my doorstep with her roommate to “hang out” while the roofers were working on their apartment I jumped at the opportunity. The three of us headed to Hobby Lobby for flower selection and while they did give my the final say really they did it themselves.

A story about the vase – it has huge meaning for me and I’ve finally gotten around to using it!  On the one year anniversary of my dad passing away one of my grandmother’s friends brought flowers to her in this vase.  I think that is such a touching thing to do and hope that I can remember that if ever I’m in the same place.  Anyway, I have the vase now and it means the world to me since it has an attachment to daddy and grandma. 


SONY DSC

And this is what they came up with!  They were pleased with the flowers because pink is my favorite color, but they didn’t want it to be baby pink.


SONY DSC

The wall color doesn’t really show well, but it’s kind of a flat, funny greenish grayish type of color.  Perfect as a background to the floral arrangement!


SONY DSC

My mother-in-law just gave me this picture and I put it next to the floral arrangement, then was delighted to see that the pink flower in the picture is very close to the pink flowers the girls picked out!  Contemplating changing the silver frame – spray paint just might be involved.

Seriously, every time I walk into the bedroom and see this it makes me smile. That’s a sign of it being absolutely perfect!

Wednesday, June 08, 2011

Candy Dipped Ladybug Pretzels

Last weekend we went up to the in-law’s house for some pool fun!  My sister-in-law and her crew from Atlanta come up every summer and we love to get up there and see them.
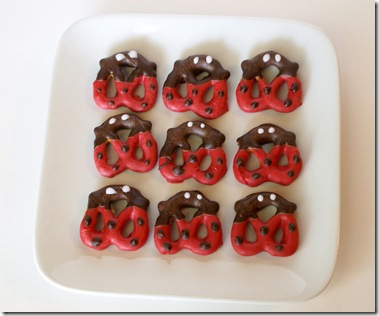
 

Plate of Ladybugs

I saw these ladybugs somewhere online and decided I MUST make them for this gathering for several reasons – 1) I LOVE novelty desserts/foods like this, 2) my mother-in-law is nuts about ladybugs, and 3) my granddaughter would be there…and that alone is reason enough!


Ladybug Closeup

They were quite a hit, especially with my granddaughter!  Luckily she’s still young enough that she'll ask before getting one each time or I really think she might have sprouted a few spots of her own!


And just in case you might want to make some of your own, here’s how I did it:
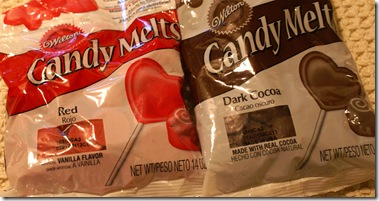
Candy Melts

The only thing you’ll need is a bag of pretzels, a teeny bit of powdered sugar and the Candy Melts shown above.  I bought mine at Walmart.


Pretzels in Red

Melt some of the red candy melts in the microwave using the instructions on the bag.  Dip the pretzels about 2/3 of the way in the candy, then place on wax paper to cool and dry.


Ladybugs Without Spots

(Pretend like I remembered to take a picture before the chocolate looked yucky….)  After the red candy has cooled and dried, melt some of the dark cocoa candy melts the same way.  Hold the pretzel by the red side and dip into the chocolate, then place on the wax paper to cool and dry.


Ladybugs With Spots

While I had the dark cocoa candy melts ready to go I went ahead and did the spots.  I tried several methods – a toothpick was too tiny and a straw was too big.  Finally grabbed one of the beaters from my mixer and that was perfect!


Candy Dipped Ladybug Pretzel

For the eyes I just mixed a very small amount of powdered sugar with an even smaller amount of milk until I got the consistency I wanted.


And that’s all there is to it!  When I do these again I’ll set up at the dining room table instead of the kitchen cabinet.  They were very easy and actually pretty fast to make, but leaning over the cabinet got to be a little tiring.

“Lovely little ladybug
sent from heaven above
please watch over my garden
and fill it up with love.”
  Author Unknown


* Linked to We Did It Wednesday, Show and Tell, What I Made Wednesday, Inspired By You Wednesdays, Hoo’s Got Talent?, Look What I Made, Strut Your Stuff, Transformation Thursday, Hookin Up With HOH

Thursday, January 27, 2011

Valentine Subway Art

“Love is in the air” most definitely around here.  I never did much decorating for Valentine’s Day when the kids were young and I find myself wondering why not.  It’s fun and what’s not to love about LOVE?!?!


SONY DSC

I found the free download at Eighteen 25 and fell in love with it.  I chose a solid black frame from Target to offset the white background and pink/red words.  LOVE IT!


SONY DSC

The hearts tickle me – I found them in the dollar spot at Target.  They are called “Table Scatter” and I find that amusing.  Smile

So for the amazing low price of $2 for “table scatter”, $5 for the frame and the negligible amount it cost to print I have a cute little Valentine display on top of the dresser in the guest room.

And it makes me smile.


* Linking to:  Valentine Party

Wednesday, January 12, 2011

WIP Wednesday

Some of the projects I have going on are bigger projects and I just hate it that it takes so long before I can share a picture.  I’ve decided to occasionally post a WIP (Work In Progress) post on Wednesdays.  Really a WIP post *has* to be on Wednesday because it feeds my love of alliteration.  Smile


SONY DSC

Mom and I have talked before about how sometimes you see a project and it just grabs you.  That’s exactly what happened to me with this project.  Little Miss Shabby is doing a year long BOM (block of the month) quilt called Birdie Stitches.  In addition to quilting it also features embroidery.

And I’ve finally gotten over feeling like I must venture out and choose my own fabrics or yarn and not use exactly what the designer used on the model.  When I saw this first block the stitching AND the fabric worked together to grab me and convince me to make the quilt.  My Moda Layer Cake in the Sunkissed pattern has arrived and I’ll be starting my block tomorrow.

--<>--

SONY DSC

Last year the bulk of my knitting was charity knitting and while I still very much want to continue with that I also want to do some other knitting as well.  I joined a group on Ravelry called YOSS – Year of Stash Socks 2011.  The premise is that instead of joining one of the fabulous sock clubs that instead we will knit a pair of socks or mittens using our stash of yarn every month during 2011.

Even if I don’t knit a pair every month I’m thrilled to pull out some of the yarn I already have.  You see, I *love* my yarn stash and everything I purchased I did so because I loved it….and still do.  So this is very satisfying to me.

The first pair of socks are coming right along and I just have a few more rounds to finish out the toe.  I’m using a self-striping yarn - Clown by Marks & Kattens and am loving it.  Self-striping yarns are fun to knit with as you get to watch the pattern develop as you go.

--<>--

SONY DSC

This is the Advent Scarf pattern by Kristin Benecken.  I’m using JaggerSpun Zephyr Wool Silk in the Vanilla color and some pearl beads.  This scarf is turning out simply divine and I’m thoroughly enjoying knitting it.  The pattern was released a section a day for the 24 days prior to Christmas, but I went into it never intending to finish it during that time.  I sit in the evening, knit and listen to a book on tape and can feel all the days troubles just melt away – seriously.  And what a gorgeous scarf I’ll have to wear next year.

Monday, December 20, 2010

Brooklyn Loves Making Handprint Snowman Ornaments

SONY DSC

We had so much fun this weekend! One of our family traditions is to have our extended family gathering the Saturday before Christmas. This way we’re all able to get together and have a wonderful time while keeping the actual Christmas holiday more low-key.

My mom and sister-in-law Michele came to town and the three of us took Brooklyn and headed out to my cousin’s house for family fun. We loved on new babies, marveled at how the kids had all grown, ate wonderful food, exchanged gifts and sang carols. Really it was great.

When we got back to my house on Saturday night we found that grandpa had gotten the original cartoon Grinch movie for us to enjoy with Brooklyn. We ran out for sub sandwiches and set up in the living room to eat and watch a movie, which turned into a real treat. Brooklyn laughed and laughed at little Max, the dog in the movie. As soon as the movie ended she was bouncing up and down and wanted to see it again. Grandpa happily obliged. Smile

On Sunday my brother-in-law and sister-in-law and the rest of the kids came over and we all had a fun lunch together. Little Bit, Brooklyn, was truly in her element having so much family here. Ah …. so blessed …

--<>--

Knowing that my 3 year old granddaughter would be here this weekend I set out to find some fun crafts for us to do together. Since we were so busy with family and making memories we only got one craft done, which is quite ok as the others will wait until next time.

I had found a tutorial for a handprint snowman ornament on a blog and I just happen to be partial to any craft involving handprints.

Brooklyn Painting

These were so easy and so fun to do. I painted her palm (she did tell me that ‘paint goes on the paper, not on fingers’ so I’m assuming they hear that in school) and she said it tickled. Smile She would wrap her palm around an ornament and when she opened her hand and saw her handprint she would grin and giggle each and every time.

SONY DSC

They are the cutest ornaments ever! This is a great project to do with littles and the best part is that you have a handprint ornament afterwards to treasure. The full tutorial is at the link above, but my biggest hint if you decide to make these is to not spare the paint on their palm. The first couple we did just had a light coat of paint and those snowmen didn’t turn out nearly as cute as the snowmen that had a thicker coat of paint.

I put her name and year on the bottom of the ornament and we’ll be giving these gifts to all the relatives.

** Linking to Making the World Cuter Monday, Get Your Craft On

Friday, November 12, 2010

Frugal Fall Centerpiece

We had the final night of our Mentorship Class at church this week and I know we’re going to miss it.  When we walked into the classroom all the tables were decorated for fall and it looked so festive.

Fall Centerpiece

The main reason I wanted to post this is – look at the pumpkins/apples/fruits sitting at the base of the scarecrow.  Y’all those are toilet paper rolls that have been covered with a square of fabric!  The ‘stem’ was cardboard and they have green felt leaves and little green pipe cleaner curly-q’s on them.  It’s really too late to get any done for this year, but they were so cute I’m thinking it might be a great thing to have next year.

So cute and so inexpensive.  And the best part – you really wouldn’t have anything to store because all you’d have to do is uncover that roll and put it too good use!!!   Winking smile

Thursday, October 28, 2010

Pumpkin Candy Bracelet

PROLOGUE:

When I knew that we would be meeting the kids at the pumpkin patch I decided to get my Grandma-ness in gear.  You already saw the cookies, but I also had seen the Pumpkin Candy Bracelet Tutorial and since it was so darling I decided that Brooklyn needed one too.

Pumpkin Candy Bracelet

This was seriously easy to make and took probably 10 minutes!  I used 9 candy pumpkins on this bracelet just as the tutorial did.


THE STORY:

Brooklyn's Bracelet

It fit and looked darling on her!  I really think she liked it.


SONY DSC

You can ever so barely see it on her wrist through the window.  This pumpkin patch had a really cute little house made of hay and Brooklyn had fun playing in it with her Daddy and Grandpa.


Brooklyn in the House

She fiddled with it a lot.  And I think it looked so cute on her!


SONY DSC

Everything is so much fun when you are 3 and have your parents and grandparents with you to be certain you’re having a grand time!


Brooklyn Riding a Tractor

And you can look girly with your pumpkin bracelet even when riding a tractor!


EPILOGUE:

When we finished enjoying the pumpkin patch we left to go have dinner at a nearby restaurant.  Brooklyn got in her car seat with mom and dad and we got in our truck and met them there.

Loni got out of their truck and walked toward me saying “Grandma!” with her hands cupped.  Uh oh….  In her hands she had all the candy pumpkins and little ribbon ties!  She said Brooklyn was so upset when it fell apart. 

I’m assuming it came undone at the knot and that my 4 or 5 knots in the dental floss were not enough.  So my caution to anybody else planning to make this bracelet is – be certain to tie it very tight!

We reassured Brooklyn that Grandma would either fix it or make her another one.  I’m not sure if she was dismayed that it broke or disappointed that she no longer had the bracelet.  Either way… it was a grandma fail moment.  Fortunately I had a bag of Soft Sugar Cookies to hand to her at that moment and redeem myself somewhat!  :)


* Linking to Get Your Craft On, I’m Lovin’ It

Thursday, September 16, 2010

A Gathered Zippered Clutch for the Opera

So as I’m getting ready for us to go see The Blue Man Group it hits me that I really don’t want to mess with my purse.  In addition to worrying about where it is I have a little problem with setting my purse on the floor after seeing a special on 20/20 or one of those shows – I just can’t do it now that I know about all the germs.  The problem though is that there are things that I simply need to carry with me!

Then I remembered seeing the Gathered Zippered Clutch all over the blogs right now and decided Bingo! – there’s my answer!


Gathered Zipper Clutch

I pulled from my fabric stash everything except the zipper, which required a quick trip up to Hancock Fabrics.


Gathered Zipper Clutch

I followed the Gathered Clutch Tutorial and couldn’t be happier with the instructions or with how it turned out.


Gathered Zipper Clutch

There were no instructions on how to add the strap, so I actually had to wing it, which is something I’m not the best at.  In case anybody needs measurements for it, I cut the fabric for my strap 3” tall x 13” wide and sewed it in at the very end when sewing the sides together.

Some notes and thoughts:

  • I only had lightweight fusible interfacing here and it definitely needs the medium weight to make it more sturdy
  • I didn’t add the divider pocket or card holders, then saw afterwards that she says if you don’t have either of those to add fleece or canvas to make it more sturdy.
  • Really for my needs – Lip Ivo, ibuprofen, cuticle cream – I didn’t need a clutch quite this big, so the next one I make will probably be smaller.  Personal choice.  :)
  • This was the first sewing project I’ve done since starting the room rearranging in our house and it took far longer to find all the necessary tools than to do the sewing.  I do see how this could be completed in a bit over an hour if you are set up.

A last note on the fabric – I was thrilled to actually use some fabric I had on hand, though I admit it sometimes scares me to cut into my fabrics.  I do love these fabrics and I know that once I cut into them they are gone – isn’t that silly?  But now that I’ve done it I’m so tickled with actually using what I had that I know I might be on a roll now.


SONY DSC

This is what I cut into and I’ll bet I’ve had it for probably 10 years (and yes, I know the fabric is dated, but I still love it).  At around that time I used to belong to a fat quarter club from somewhere online that would send a coordinated packet of 8 fat quarters once a month or every other month.  I probably did it for a year and every one of those packets is beautiful – and I have no idea where they are from.  So any fabric sellers out there take note – be sure to put your company name and url on your tags so we can return and buy more!  :)


** Linking to Get Your Craft On, Show Off Your Stuff Sewing and Crafts, I’m Lovin’ It, Show and Share Day, Sew and Tell, Get Your Craft On

Tuesday, August 31, 2010

40 Rocks – Happy Birthday Gift for Sister-in-Law

  SONY DSC

I mentioned yesterday that the family came down over the weekend to celebrate my sister-in-law’s 40th birthday – which is today by the way – Happy Birthday Michele!

Thinking, thinking …. what gift to give?  She’s been celebrating turning 40 for a bit and is fully embracing it.  And this is what I came up with, especially since my 40’s have been the best years of my life and I’m hoping the same for her.


SONY DSC

A side note to the “rocks” portion of this gift – Aunt Michele was the one that brought Pop Rocks for Brooklyn to try for the first time.  That made this gift even more perfect for her!


SONY DSC

And yes, double meaning to the words on the jar.  I’m hoping that Michele’s years in her 40’s really do “rock” and she enjoys them to the fullest.  And also, there are 40 “rocks” – pop rocks – inside the jar!


SONY DSC

The technical information on the jar –

  • label is the Bigz Top Note die from Stampin’ Up
  • the 40 and ROCKS is from the Cricut cartridge Winter Wonderland
  • stamp set on the lid is Crazy for Cupcakes from Stampin’ Up
  • 5/8” Satin Ribbon in Basic Black and Real Red from Stampin’ Up

I put some red paper “Easter grass” from the gift wrap section in the bottom of the jar, then added all the pop rocks.


001 copy

And I do believe she liked it!


** Linking to Take a Look Tuesday, Anything Related, Toot Your Horn Tuesday, Topsy Turvy Tuesday, Talented Tuesday, Get Your Craft On, We Did It Wednesday, Spotlight Yourself, Whatever Goes Wednesday, Look What I Made!